created Friday September 8, 2017 11:38 CDT
updated Monday August 29, 2022 20:33 CDT
WARNING: This guide is for the Linksys EA8500 running dd-wrt firmware and it also works perfectly fine on the Netgear WNDR3700v4 running dd-wrt. It may work for several other Atheros / QCA devices --- However, you should not attempt to use this guide on a device unless you are absolutely sure the ports are wired the same way. The EA8500 QCA IPQ806X router has the same switch as the Netgear r7800 but it's not wired the same and this guide will not work. Using this guide on routers with different switch setups will likely, at best lock you out of your router or could do other more severe harm to your device. If you would like to compare your switch port configuration to the EA8500 'here is a picture' showing some differences of the Linksys EA8500 & the Netgear r7800.
Update: More info about VLAN on Netgear r7800 found 'here in dd-wrt forums.'
EA8500 VLAN Detached Networks with DD-WRT
This is fairly simple once you get your head around it.
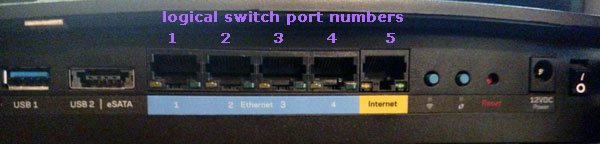
One thing that makes it a little easier with the EA8500, physical port numbers match switch numbers.
I'm going to show some configurations and let you go from there.
As far as I know this is the easiest way to do VLANs on a level I can share where hopefully all can understand.
All can be done thru the GUI and using simple 'startup commands'. All configs are good thru reboot, other build
installs or whatever else you choose to do. Works ok on Kong or Brainslayer dd-wrt builds. I haven't tested
more than 7 or 8 builds and would advise to use one made within 2017 but older will probably work.
You will see that the added VLANs in the GUI on 'Networking' page need to be configured exactly as the interfaces
we create using startup commands. There are several reasons to have the interface networks input in the GUI.
One good example is so we do not have a bunch of extra added firewall mess that very few people understand.
'Net Isolation' also works very well for most all wired port restrictions for VLANs.
All VLANs will be completely isolated from each other and isolated from main interface if 'Net Isolation' is enabled.
I suggest you know exactly what you are doing before adding any VLANs to an existing complex network.
It is perfectly fine to create VLANs on any existing configuration as long as you understand what you are doing.
IMPORTANT NOTES:
DO NOT name a VLAN as VLAN 1 or VLAN 2. Those are in use and should not be messed with.
AFAIK any other number is fine. I used VLAN numbers that correspond to the subnet I create just to help keep things straight.
When making different VLAN configurations you should keep the startup commands in order that I have them.
Different order may or may not work. If mixing the order does work it will likely load slower making for mixed results.
"Why does it seem like we are doing the same thing twice in startup commands and in the GUI?"
AFAICT this is what I consider race conditions about what & when certain items are created ... Lets just say you
cannot set parameters on some things that are not yet there...... I would likely get most of it wrong trying to explain further.
For adding networks using ifconfig you can use --
ifconfig vlan7 192.168.10.1 /24
or
ifconfig vlan7 192.168.10.1 netmask 255.255.255.0
It makes no difference, but respect the spaces. Any valid address and subnetmask should work, just be mindful
when you create multiple DHCP server that the range you set is in fact a range within your netmask.
Each guide below assumes you have router IP of 192.168.1.1 and you start with a somewhat dd-wrt default configuration.
There's hundreds of possible configurations for VLANs & WLANs.
Here is some different configurations and steps to do them.
~ 1 ~
Ok let's do an easy one first. We will set port 2 as a VLAN on 192.168.22.1
Copy text below and paste into the 'Commands' window at routerIP/Diagnostics.asp
swconfig dev eth0 vlan 1 set ports "0t 1 3 4"
swconfig dev eth0 vlan 22 set ports "0t 2"
swconfig dev eth0 set enable_vlan 22
swconfig dev eth0 set apply
vconfig add eth0 22
ifconfig vlan22 192.168.22.1 /28
Click the 'Save Startup' button
Reboot router.
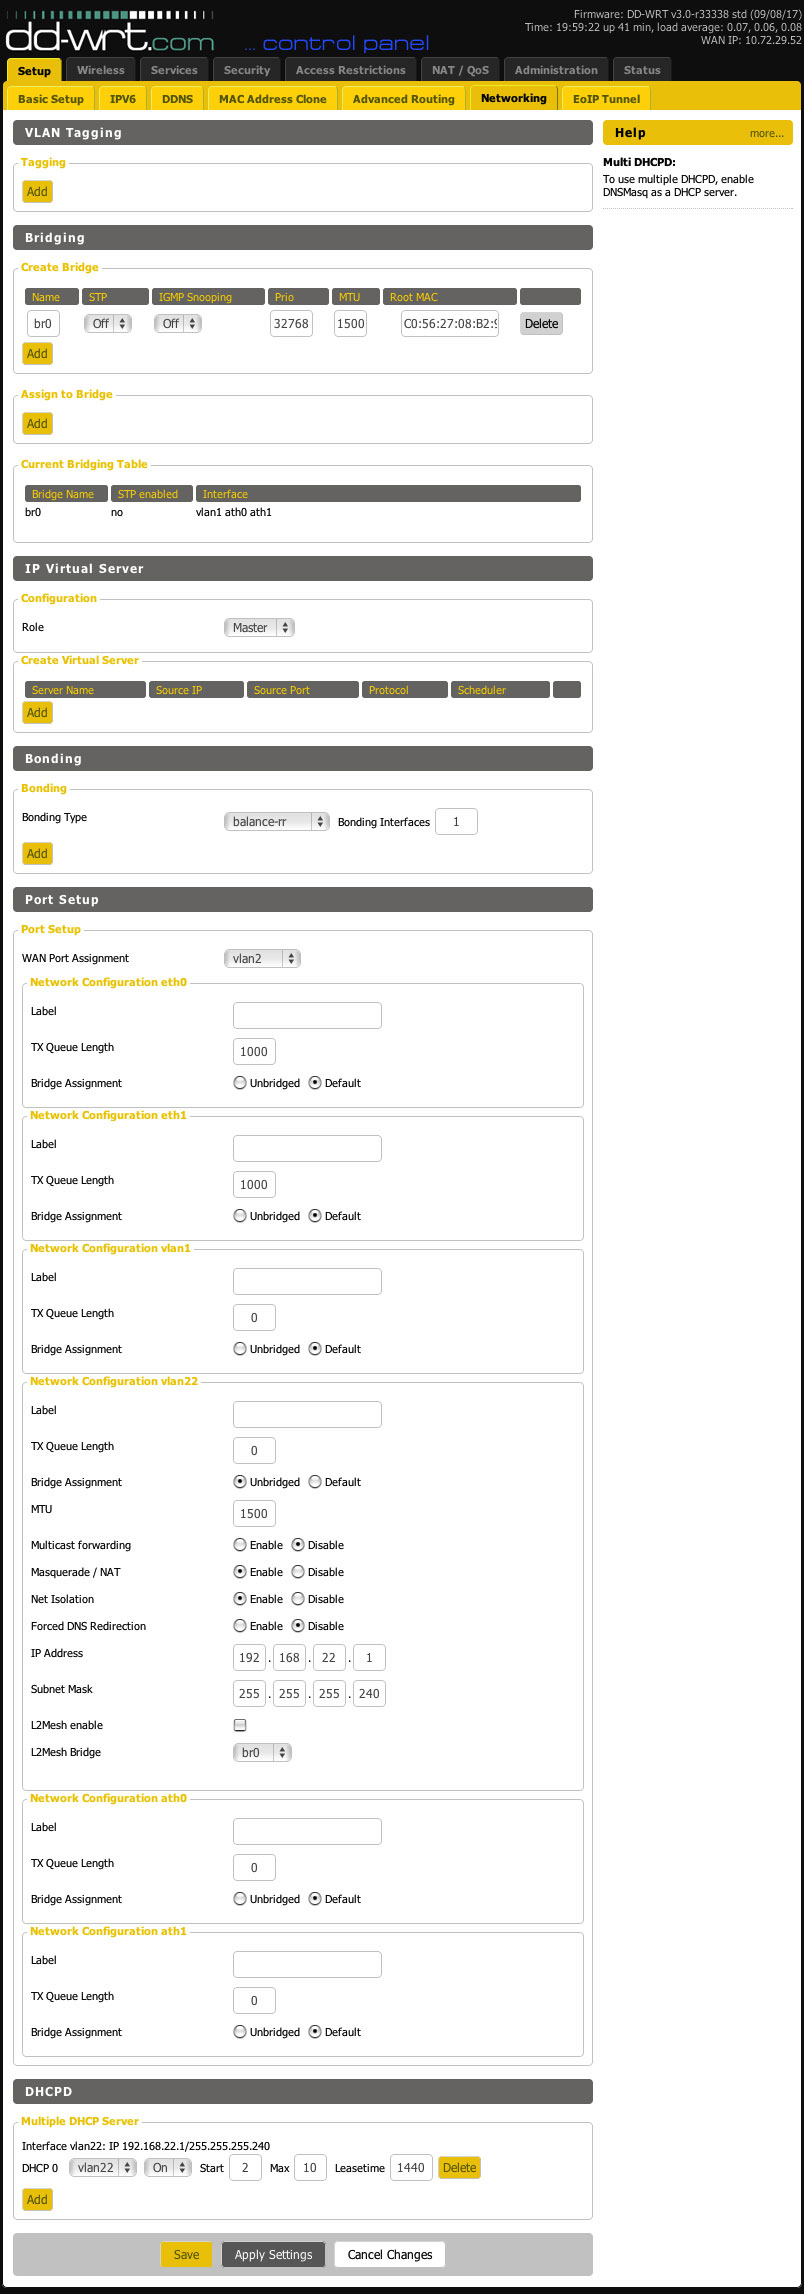
Go to routerIP/Networking.asp and you should see the newly created interface Network Configuration vlan22
Click the 'unbridge' button associated with Network Configuration vlan22
Masquerade / NAT should be Enabled
Net Isolation should be Enabled
Put in IP Address 192.168.22.1
Put in subnetmask 255.255.255.240
Click the 'Save' button at bottom of page.
Click add in the Multiple DHCP Server section
Select vlan22 ..... ummm we need to change the dd-wrt default of Start IP address because our subnet/netmask will
only allow 14 total host so we set Start to 2 and I'm just gonna put in 10 for max... You're wondering why the weird
subnetmask --- no special reason other than I'm actually writing this so the pictures I did couple days back will match
what I'm writing and I don't have time to redo pictures.
Leave lease time at 1440 or set whatever suits you --- it is minutes so 1440 = 1 day.
Click the 'Apply Settings' button.
Reboot the router.
That's all there is to it.
Should have this in routerIP//Diagnostics.asp -

and your networking page should look like -
Plug your network cable into port2 and you should get an IP in the 192.168.22.x range.
If you have a live WAN you can access the internet.
If you leave 'Network Isolation' disabled you can also access the router from this interface.
Pretty simple, huh :-)
~ 2 ~
Let's set port 3 & 4 as a VLAN on 192.168.7.1
Copy text below and paste into the 'Commands' window at routerIP//Diagnostics.asp
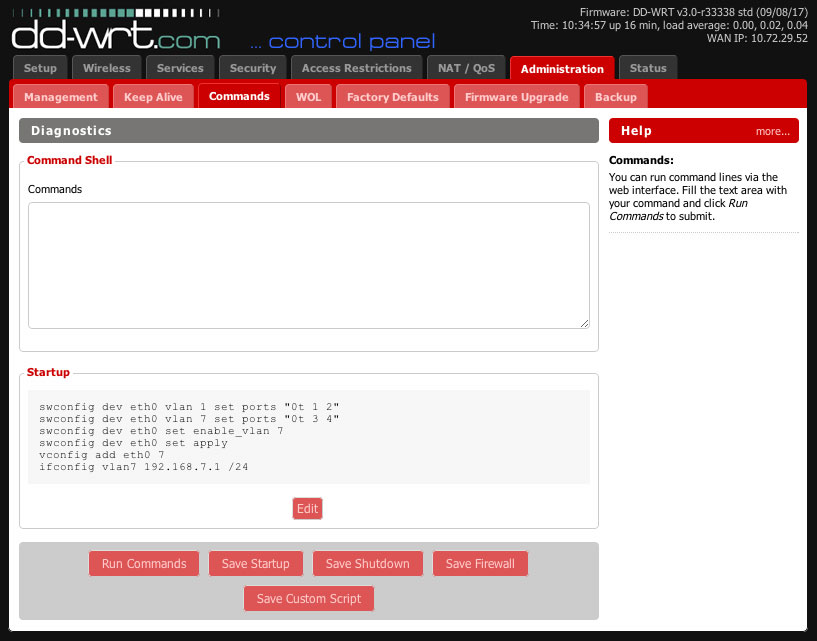
swconfig dev eth0 vlan 1 set ports "0t 1 2"
swconfig dev eth0 vlan 7 set ports "0t 3 4"
swconfig dev eth0 set enable_vlan 7
swconfig dev eth0 set apply
vconfig add eth0 7
ifconfig vlan7 192.168.7.1 /24
Click the 'Save Startup' button
Reboot router.
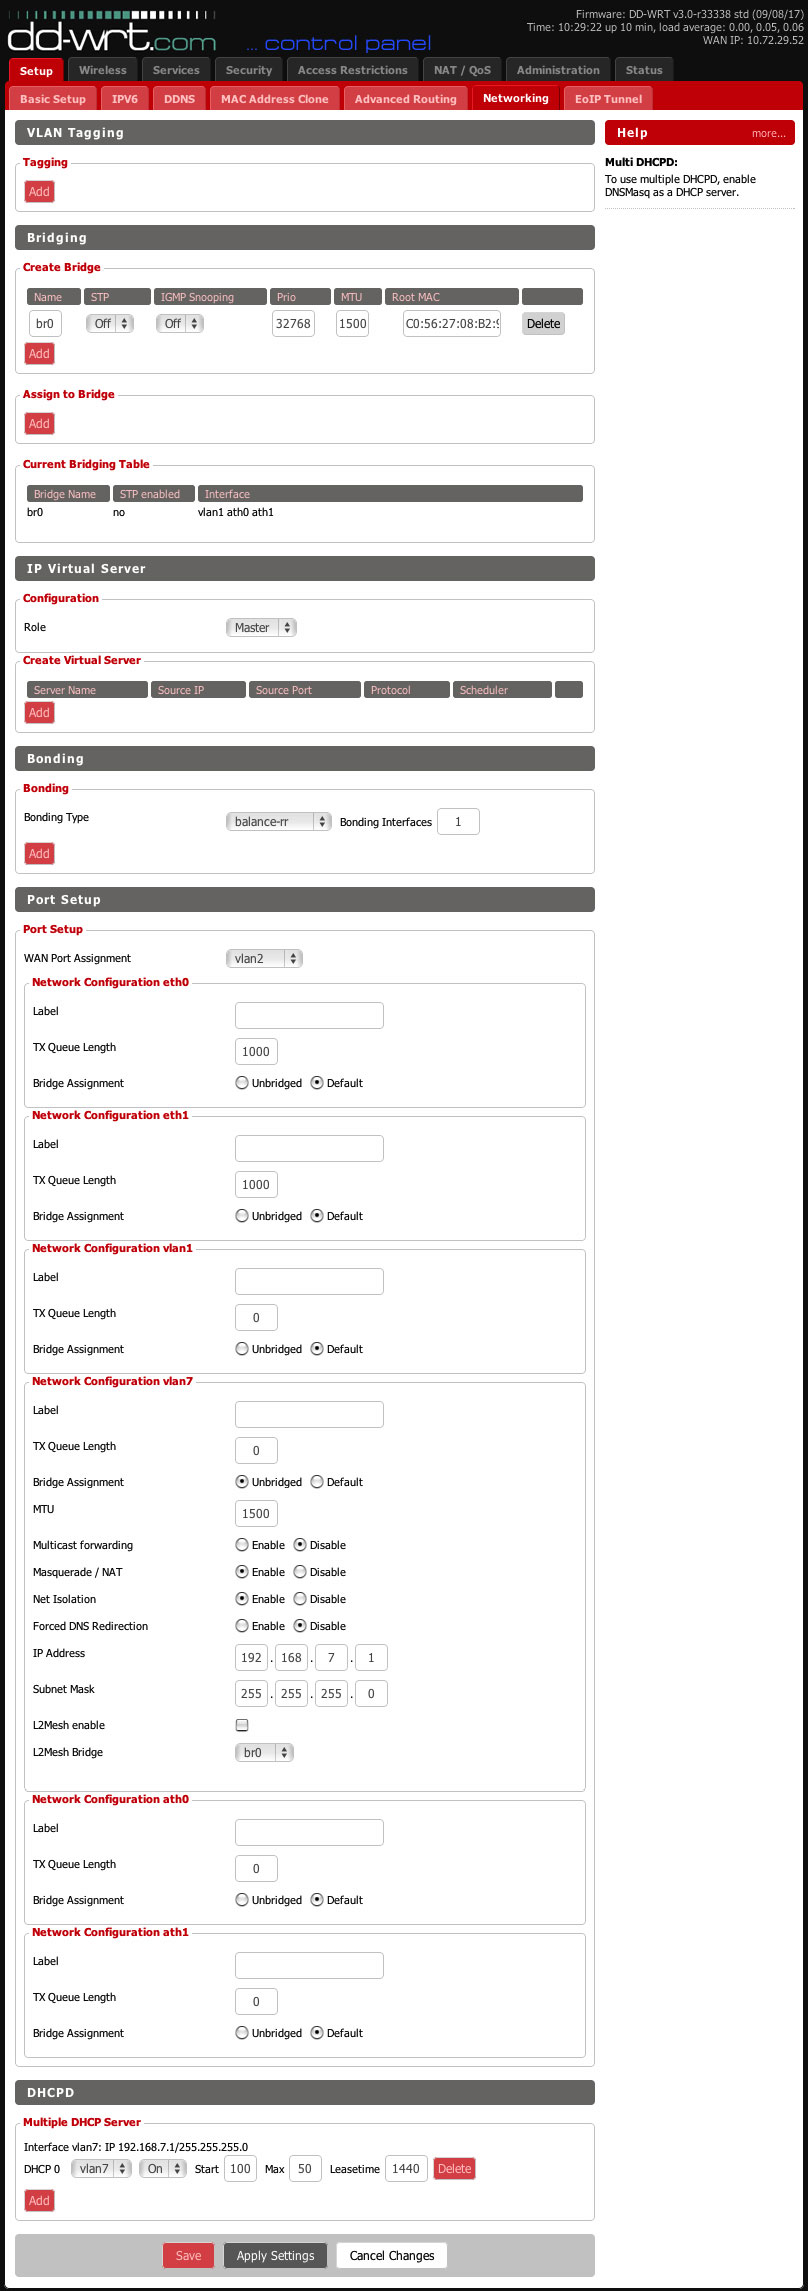
Go to routerIP/Networking.asp and you should see the newly created interface Network Configuration vlan7
Click the 'unbridge' button associated with Network Configuration vlan7
Masquerade / NAT should be Enabled
Net Isolation should be Enabled
Put in IP Address 192.168.7.1
Put in subnetmask 255.255.255.0
Click the 'Save' button at bottom of page.
Click add in the Multiple DHCP Server section
Select vlan7
Click the 'Apply Settings' button.
Reboot the router.
Yay! You're done.
Should have this in routerIP//Diagnostics.asp -
and your networking page should look like -
~ 3 ~
Yes you can do same thing while in 'Client Mode'. Remember client mode makes one of the
physical wireless interfaces the WAN so this leaves you with an extra port to play with.
In 'Client' mode bridged using ath0 (2.4 GHz)
This all works exactly the same way.
We will do:
port 1 & 2 = 192.168.11.1 via br1 to include ath0.1 & ath1
port 3 & 4 = 192.168.33.1 via br2 to include ath1.1
port 5 = 192.168.1.1
Connect in Client mode to some wireless device somewheres and add ath0.1 VAP + ath1.1 VAP
I'm not giving details about doing 'Client' mode. You can find that info in dd-wrt wiki or forums.
With config done using guide below only port 5 can access router so after you get in client mode
and assign WAN port to switch you should go ahead and plug network cable into port 5
Networking page create br1 & br2
Apply Settings
Unbridge br1 and put in
192.168.11.1
255.255.255.0
Masquerade / NAT & Net Isolation are enabled
Save
Unbridge br2 and put in
192.168.33.1
255.255.255.0
Masquerade / NAT & Net Isolation are enabled
Apply Settings
Assign br1 to ath0.1
Save
Assign br1 to ath1
Save
Assign br2 to ath1.1
Save
Add multiple DHCP server for br1
Save
Add multiple DHCP server for br2
Save & Apply Settings
Copy/paste text below and Save Startup
swconfig dev eth0 vlan 1 set ports "0t"
swconfig dev eth0 vlan 11 set ports "0t 1 2"
swconfig dev eth0 vlan 33 set ports "0t 3 4"
swconfig dev eth0 set enable_vlan 11
swconfig dev eth0 set enable_vlan 33
swconfig dev eth0 set apply
vconfig add eth0 11
ifconfig vlan11 up
vconfig add eth0 33
ifconfig vlan33 up
brctl addif br1 vlan11
brctl addif br2 vlan33
Copy/paste text below and Save FIREWALL
iptables -I INPUT -i br1 -m state --state NEW -j DROP
iptables -I INPUT -i br1 -p udp -m multiport --dports 53,67 -j ACCEPT
iptables -I FORWARD -i br1 -o br0 -m state --state NEW -j DROP
iptables -I INPUT -i br2 -m state --state NEW -j DROP
iptables -I INPUT -i br2 -p udp -m multiport --dports 53,67 -j ACCEPT
iptables -I FORWARD -i br2 -o br0 -m state --state NEW -j DROP
../Diagnostics.asp should look like

Reboot Router
On networking page
Assign br1 to vlan11
Save
Assign br2 to vlan33
Save & Apply Settings
Reboot Router and thats all :-)
Networking page should look like---

All networks will follow global QOS settings.
All interfaces are selectable in QOS Interface Prioriy .... not sure how well that works...not tested.
~ 4 ~
Ok one more then I'll quit. This is just standard gateway router.
port 1 = 192.168.1.1
port 2 = 192.168.22.1
port 3 = 192.168.33.1
port 4 = 192.168.44.1
port 5 = WAN
Startup commands:
swconfig dev eth0 vlan 1 set ports "0t 1"
swconfig dev eth0 vlan 22 set ports "0t 2"
swconfig dev eth0 vlan 33 set ports "0t 3"
swconfig dev eth0 vlan 44 set ports "0t 4"
swconfig dev eth0 set enable_vlan 22
swconfig dev eth0 set enable_vlan 33
swconfig dev eth0 set enable_vlan 44
swconfig dev eth0 set apply
vconfig add eth0 22
ifconfig vlan22 192.168.22.1 /24
vconfig add eth0 33
ifconfig vlan33 192.168.33.1 /24
vconfig add eth0 44
ifconfig vlan44 192.168.44.1 /24
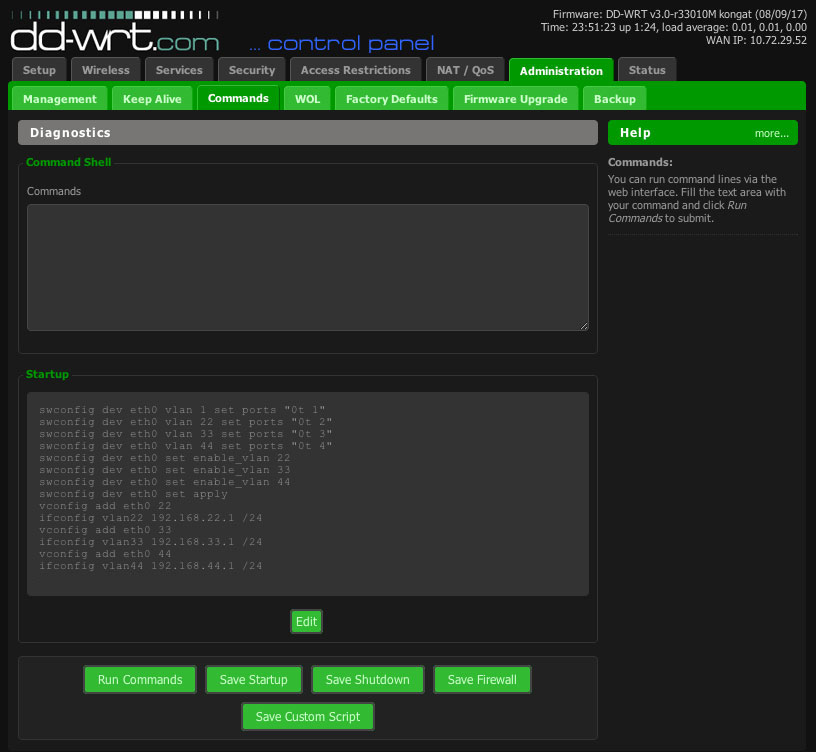
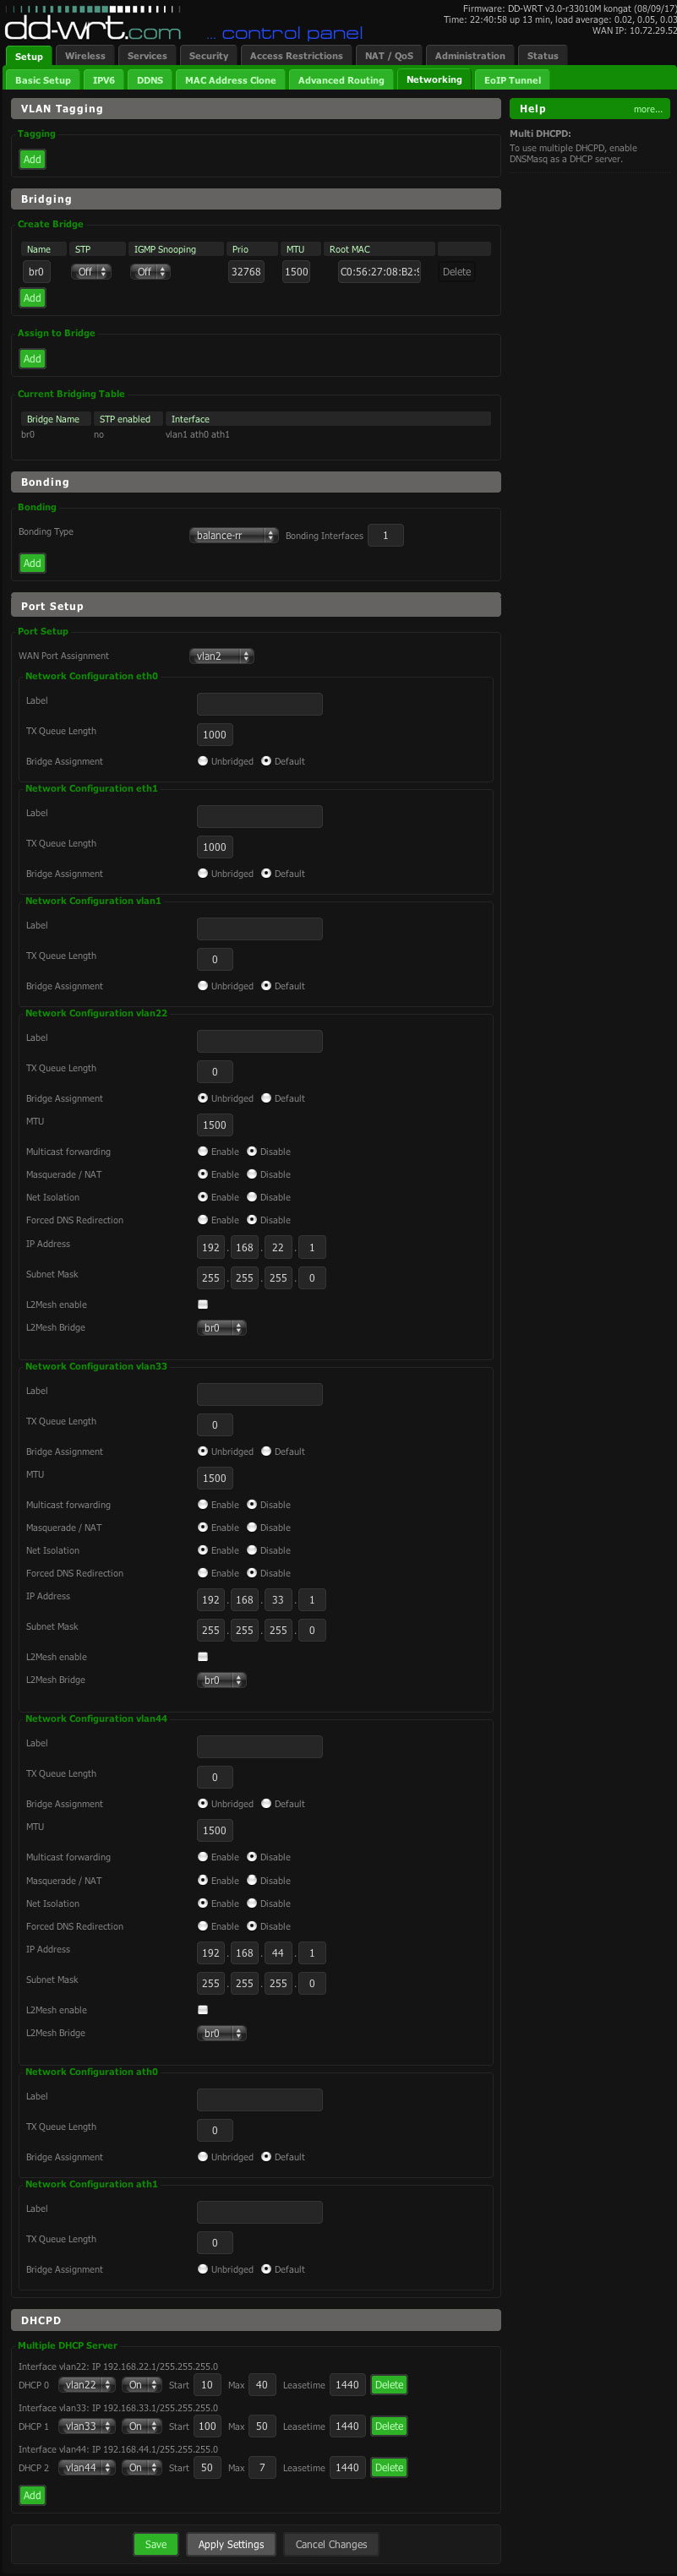
GUI Networking page:
Unbridge each new VLAN and give it the exact matching network & netmask as in startup.
Make DHCP for each.
Reboot Router
No extra firewall rules needed for this if using Net Isolation.
You can set static leases same way you normally would in the GUI.
DNSMasq will recognize any interface that is properly setup so you can set static leases for clients on any interface.
Do you need DD-WRT on your (made for North America) EA8500 ?
See 'Installing DD-WRT on the Linksys EA8500'
mrjcd™ 17,320 